Raising Rooster

cultivating minds while harvesting sanity

  • Home
  • About Me
  • Contact Me

July 20, 2019

Fun at Your Fingertips: Ice Cream Play Dough

July 20, 2019

Time for a little themed sensory play!  My sweet little Rooster is turning 3 this week and requested an ice cream party for her birthday.  Since I love a good theme, I am making this whole week about ICE CREAM! In preparation for a week of activities, I decided to whip up a batch of ice cream play dough.

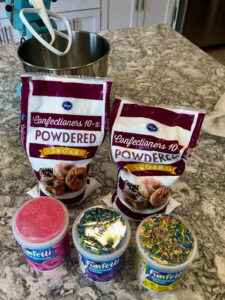
 It is SUPER easy!  The only two ingredients are frosting and powdered sugar.  That’s it! I decided to make a triple batch with pink, purple, and yellow.  I like using the Funfetti kind because it is already colored and comes with sprinkles.  For making all three colors, I will use 3 tubs of frosting and 2 bags of powdered sugar.  All of this cost me around $7.00 total for a week of sensory fun.

Making Ice Cream

Making the Dough

This too is easy and something your child would probably enjoy helping with.  In our KitchenAid mixing bowl we combined one whole tub of frosting, the included sprinkles, and 3 cups of powdered sugar.  Mix on low until the powdered sugar gets mixed in with the frosting to prevent a sugar storm. Once it is pretty well blended, you can turn the speed up to medium.

Watching Ice Cream

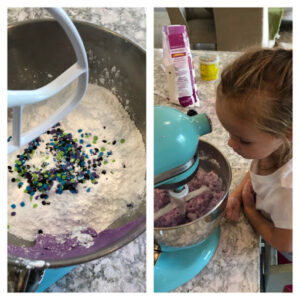
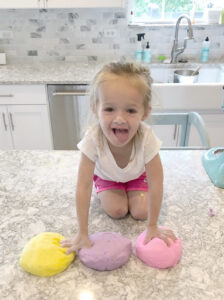
Now take it out of the mixer and knead it together to form a nice ball.  You are done! I repeated the entire process 2 more times, thus resulting in 3 balls of “ice cream” play dough.  It has a fun texture, smells like ice cream, and is edible. I would not recommend eating it, but if your little one sneaks a little in their mouth, a sugar high is your only concern.


All set mommy


Using the Dough

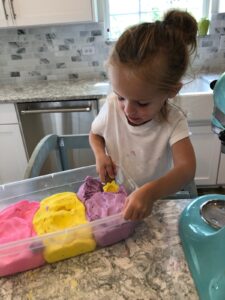
After making the ice cream dough, I placed all three colors in a small tub from the Dollar Tree.  I left them separated, but know it will not be long before they get all mixed. You can use this dough just like normal play dough, but I am keeping the ice cream theme going.  For this first day of use, I just let my daughter explore with scooping the dough into her ice cream cups. She played with it for about 30 and would have played longer if I didn’t have to tell her to clean up.  So for today, this provided us with an hour of fun, minimally messy, and educational fun (30 minutes making & 30 minutes playtime).

Playing with colors

Preserving the Dough

I plan on using this dough with my daughter throughout the week.  I covered my tub with some plastic wrap and placed it in the refrigerator.  It will dry out some with use, but drizzle a little olive oil on it and knead to bring back to its original texture.

Please check back later in the week to see what other ice cream activities and book recommendations!

Posted by ashleyraisingrooster
Filed Under: Uncategorized Tagged: easy playdoh, ice cream activities, ice cream play dough, ice cream playdoh, ice cream tot school, playdoh recipe, sensory bin, sensory play

June 19, 2019

Fun at your Fingertips: Rainbow Rice

June 19, 2019


Sensory tubs are a must at our house! Not only because my daughter loves them and they are great for development, but they are a sanity saver! Nothing keeps my daughter occupied and happy as long as sensory play. It is also great to use for a variety of learning topics, so one big batch can create months of learning fun!

The current batch that my daughter is playing with I started back in February when I hosted a Valentine’s Day party. Rainbow rice is cheap, easy to make, and cleans up extremely easily.

I recommend getting most of the supplies at a dollar store. Personally, I go to the Dollar Tree. I bought 5 bags of white rice, 1 package of gallon Ziploc bags, and a roll of parchment paper. The only other thing you will need is liquid watercolors. This is something I always have because I use it for a variety of craft projects. If you don’t have any I recommend buying a set on Amazon. I promise you will use them for other things too. I bought the Colorations 6 pack which cost about $25. Some people use food coloring mixed with vinegar, but that can be smelly and doesn’t produce as bright of colors.

Once you have all of your materials, you can make your rice in less than 15 minutes and even let your child help! Pour one bag of rice into a gallon bag and add a ¼ cup of liquid. I mix the liquid watercolors with some water to compose the ¼ cup. For brighter colored rice use more watercolor and less water, and for a lighter shade use more water.  My go to ratio is 2 Tbsp of watercolor and 2 Tbsp of water.  There really is no science to this. Now the fun part! Zip the bag and shake away. My daughter loves helping with this step. You want to make sure the rice is completely covered. 

Once it is thoroughly coated, pour it onto a sheet of parchment paper to dry. It takes about 1-2 hours to completely dry.  Often, I make this right before nap time with my daughter so it is dry, and is ready to be enjoyed when she wakes up!  To help with the drying process I stir it around on the paper occasionally.

After it is completely dry, I pour it into our sensory tub. I bought one large shallow tub with a lid from Menards. It cost around $5. When I switch out the rice for a different medium, I put the rainbow rice in 2 small containers with lids that I bought at the Dollar Tree. That way they are easier to store and I only need one large tub.

It will look this beautiful for about one minute until your child mixes it all up!

This kept her happily playing for over an hour!

Tips for Play:

  • Provide spoons, cups, bowls and just let your child explore! My daughter loves just scoping the rice and pouring it from container to container.
  • Hide objects in the sand for your child to find. They can be foam letters if you are working on the alphabet or plastic animals if you just want something fun for them to find. I have even hidden puzzle pieces.
  • To add more fine motor, give your child tweezers or tongs and see if they can use those to find objects.

Tips for Maintenance:

  • Always place the tub on a large tablecloth while your child plays with the rice. Rice will find its way out of the tub no matter how much you tell your children to keep it in. When playtime is done, simply pick up the table cloth from the corners and pour it back in. This way you don’t lose any rice and clean up is easy!
  • If some rice gets off the table cloth, just vacuum it up.
  • After a week of play, store it in a small tub or Ziploc bag. It keeps for months so no need to throw it away. Like I said, by current batch I started back in February.

Have you ever tried making rainbow rice? Did this motivate you to give it a try? Please let me know if it was a success for you or if you have any question!

Posted by ashleyraisingrooster
Filed Under: Uncategorized Tagged: preschool activities, rainbow rice, sensory bin, sensory play, sensory rice, sensory tub, tactile learning, teaching toddlers, toddler activities, Tot School

Meet Ashley

    Social

    E

    Theme by 17th Avenue · Powered by WordPress & Genesis